
Author's archive
* Building a homelab NAS: hardware selection
6. July 2025, Jakub Horák. Categorized as NAS.
My household pays a significant amount to back up photos to the cloud. We have both an iCloud+ subscription for 10,99€ monthly and a Dropbox Plus plan for 119€ yearly. That’s about 21€ per month for roughly 600GB of photos and videos. These costs could definitely be optimized by moving to a homelab NAS server.
An important consideration for me is the size of the case. Initially, I was looking at SSD MiniPCs like the GMKtec NucBox G9, but SSDs get really expensive as storage needs grow and they aren’t as modular or easily upgradable as a proper DIY build. Many people on Reddit complained about the thermal Speed isn’t a factor here since HDDs are fast enough for photo storage. The smallest form factor that made sense for me was Mini-ITX.
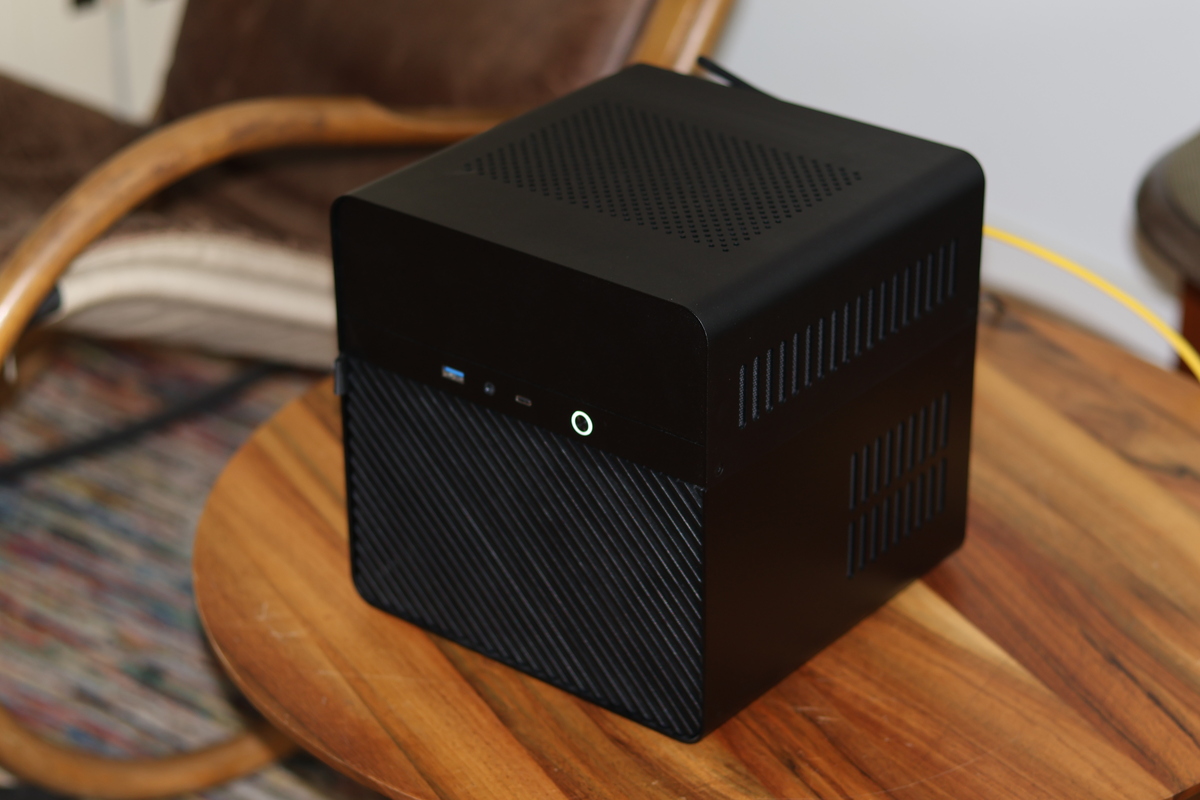
While searching for a small Mini-ITX case, I found excellent reviews about the Jonsbo N2. I discovered some great videos on Wolfgang’s channel on YouTube. He has a video about the case and about the motherboard he installed in it: the ASRock N100DC-ITX. After researching alternatives, I couldn’t find anything better, so I decided to go with the same setup. The Intel N100 processor is very energy efficient and should provide adequate performance for a NAS. While a newer N150 would be appealing, there aren’t any Mini-ITX motherboards available with that chip yet.
Here’s my part list:
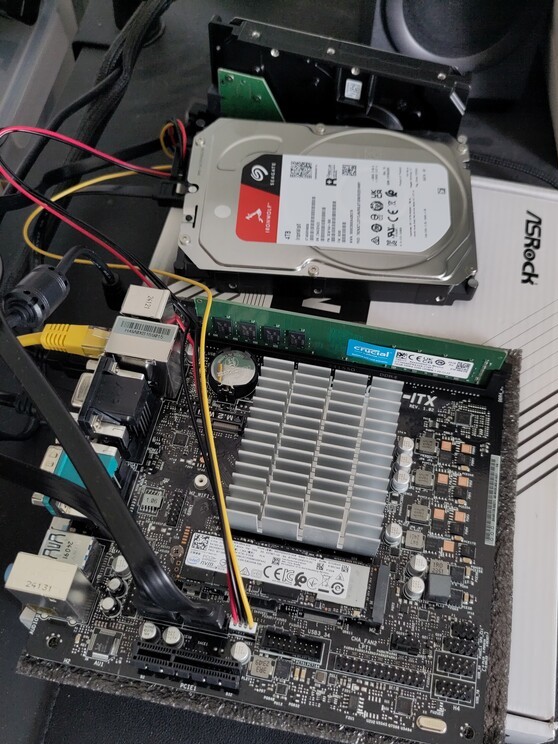
- Motherboard: ASRock N100DC-ITX
- Power supply: Leicke Ull 90W with 5.5 x 2.5 mm barrel jack plug
- Case: Jonsbo N2
- Storage: 2x 4TB Seagate Ironwolf NAS HDD
- Memory: Crucial 16GB RAM DDR4 3200MHz CL22 (CT16G4DFRA32A)
- Cooling: Noctua NF-A9x14 PWM case fan
- Wireless: Waveshare AX210 wireless card with Wi-Fi 6E and Bluetooth 5.3
That’s all for this post, I plan to write another one about the software soon.
* Audio box toy
12. March 2024, Jakub Horák. Categorized as Electronics.
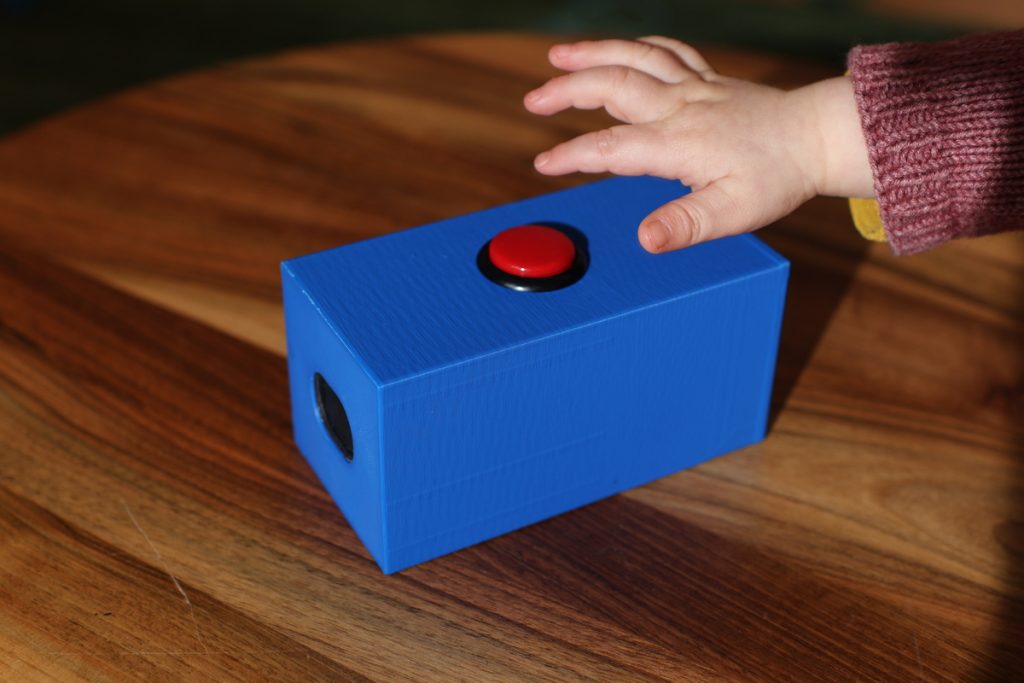
For Christmas, I wanted to create a special homemade toy for my one-year-old daughter. I remembered seeing an article some time ago about someone making a wooden box toy for their niece, which played songs uploaded as MP3 files. I decided to adapt this idea and create a similar toy using 3D printing.
The concept is straightforward: a large red button that, when pushed, triggers a microcontroller to play an MP3 file through an amplifier and a speaker (I chose a 2W speaker).
In my initial prototype, I used two AA batteries, but they didn’t seem to provide enough power to the microcontroller to drive the audio speaker effectively. So, I purchased a cheap 5000 mAh powerbank. I attempted to power the USB port using the powerbank, but it wasn’t sufficient either. As a last resort, I opened up the powerbank and soldered the internal LiPo battery directly to the VSYS pin of the WeAct Studio RP2040. The battery now lasts for about 4 days, but this introduced a new problem. To charge the LiPo through the powerbank’s USB-C port or to use the USB-C port on the RP2040 to change the MP3 song, I needed to desolder the LiPo again, otherwise risking damage to the RP2040. To address this issue, I installed a small on-off slide switch between the battery and the VSYS pin of the RP2040. This allows me to disconnect the battery from the microcontroller and use the USB-C port on the powerbank for charging, or the RP2040 USB-C port to change a song.
To create the MP3 files, I used Audacity to select a suitable section of a song, roughly 10 seconds long. I then applied an “Amplify” effect to decrease the volume. The required decrease varied depending on the song, ranging from -7dB to as much as -18dB.
Since there are no ports on the outside of the box, I wanted to make the screw holes reusable. To achieve this, I used threaded heat-set inserts from CNC Kitchen. With a special soldering tip, it’s easy to install them into a 3D print.
The 3D models for the box are available on Printables. Here’s a list of parts:
- Microcontroller WeAct Studio RP2040 – 2MB variant
- Amplifier Max98357 I2S 3W Class D
- Arcade button Sanwa 30mm
- Speaker 4 Ohm 2W
- Heat-set M4 threaded inserts
- M4 screws
- 5000mAh powerbank with USB-C port
The code itself is pretty straightforward:
1 2 3 4 5 6 7 8 9 10 11 12 13 14 15 16 17 | import board import audiomp3 import audiobusio import alarm audio = audiobusio.I2SOut(board.GP0, board.GP1, board.GP2) mp3 = audiomp3.MP3Decoder(open("song.mp3", "rb")) while True: audio.play(mp3) while audio.playing: pass print("Going to sleep") pin_alarm = alarm.pin.PinAlarm(pin=board.GP15, value=False, pull=True) alarm.light_sleep_until_alarms(pin_alarm) print("Waking up") |
I must say, my daughter really enjoys the toy; she loves pushing the button repeatedly. After a couple of weeks, she got tired of it, so I changed the song, and now the toy has regained her interest.
* Battery-powered thermometer
4. October 2023, Jakub Horák. Categorized as Electronics.
We have one indoor thermometer to tell us the temperature inside of our flat. It is actually a secondary function of an alarm clock, which is not particularly beautiful. I’ve decided to create my own, better looking and more accurate thermometer. I thought, how hard can it be?
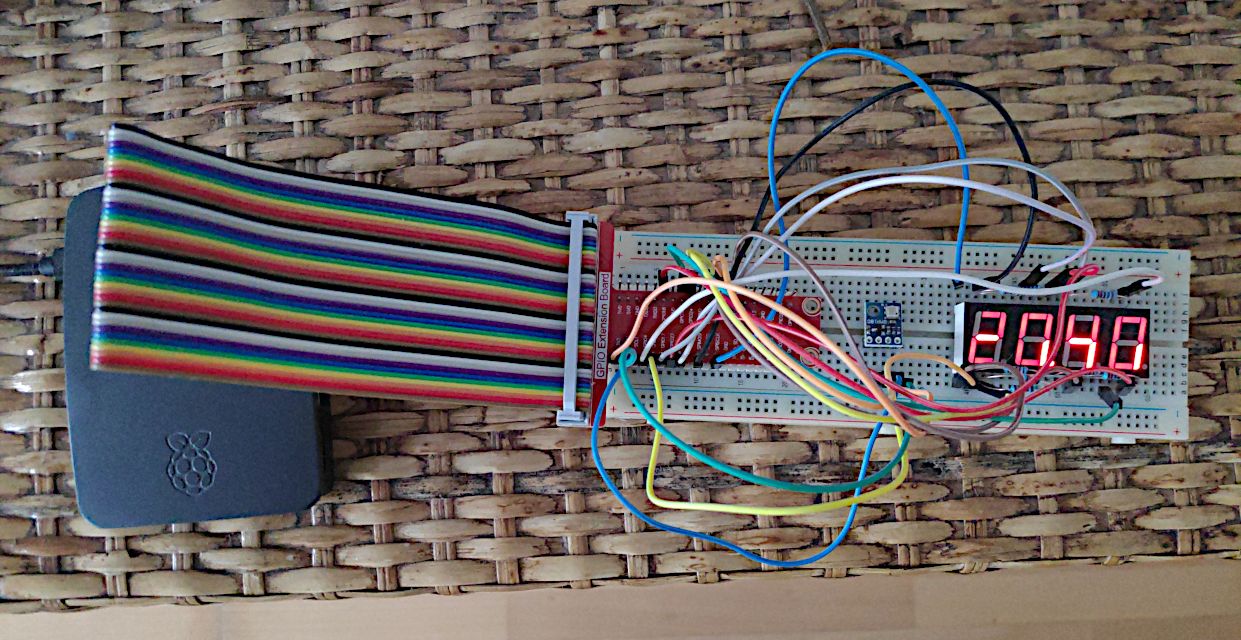
First, I started by ordering a bunch of components and wanted to try them out on a Raspberry Pi 3. I put together a simple seven-segment display and a temperature sensor BMP180.
The temperature readings didn’t seem accurate to me and I found in the specification, that the reading can vary ±2°C. So I’ve decided to get a more accurate sensor, the MCP9808.
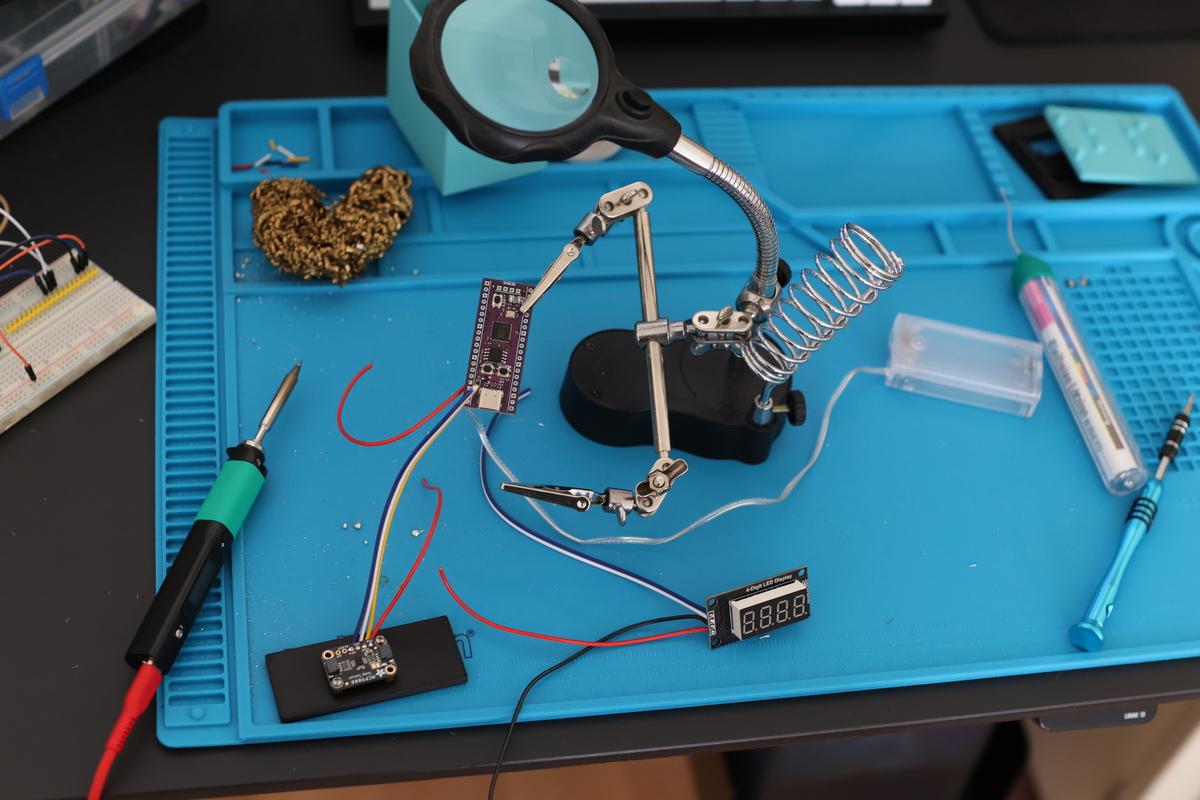
Then came the time to make it battery powered. It makes little sense to run a Raspberry Pi 3 on a small battery, since it’s a single-board computer and takes a lot of power to operate. In order to save battery juice I needed to use a microcontroller instead. I chose an unofficial variant of the Raspberry Pi Pico, which has a USB-C port, the Weact Studio RP2040.
I also opted to replace the display. The simple seven-segment display would require too many wires and I wanted to make my soldering job as easy as possible. So I got the TM1637, which is on a breakout board.
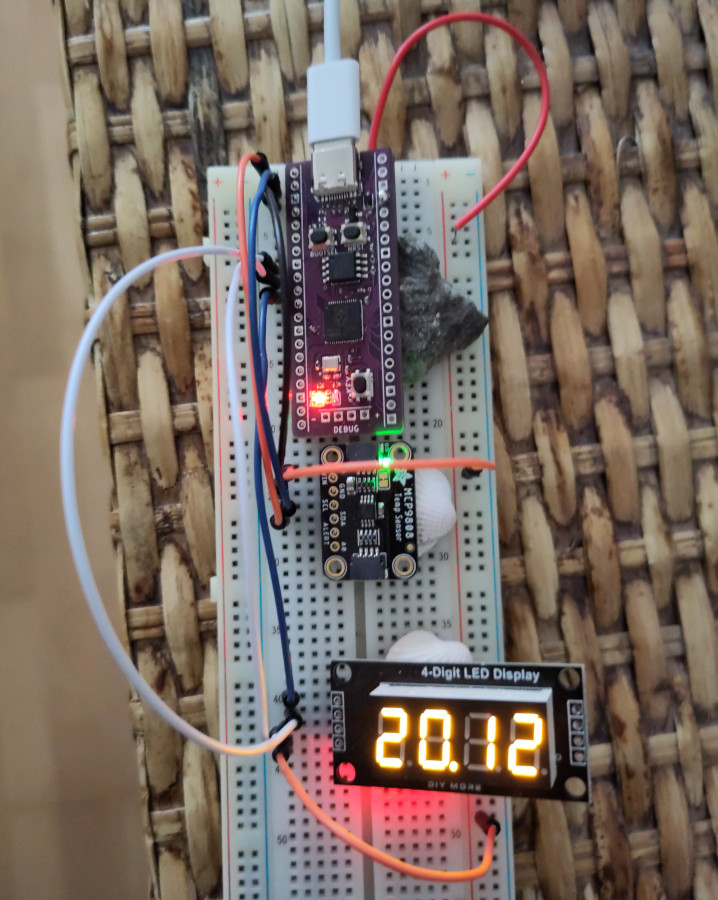
Now let’s get to programming in Thonny IDE. The biggest decision was whether to use MicroPython or CircuitPython. CircuitPython is a fork of MicroPython by Adafruit. I chose CircuitPython as Adafruit releases the MCP9808 library natively in CircuitPython and it’s the main library I need. There is a compatibility layer for MicroPython called Blinka, but it does not fit into the 2MB flash memory. Fortunately, there is a native CircuitPython firmware for Weact Studio RP2040 and a CircuitPython port of TM1637 library too.
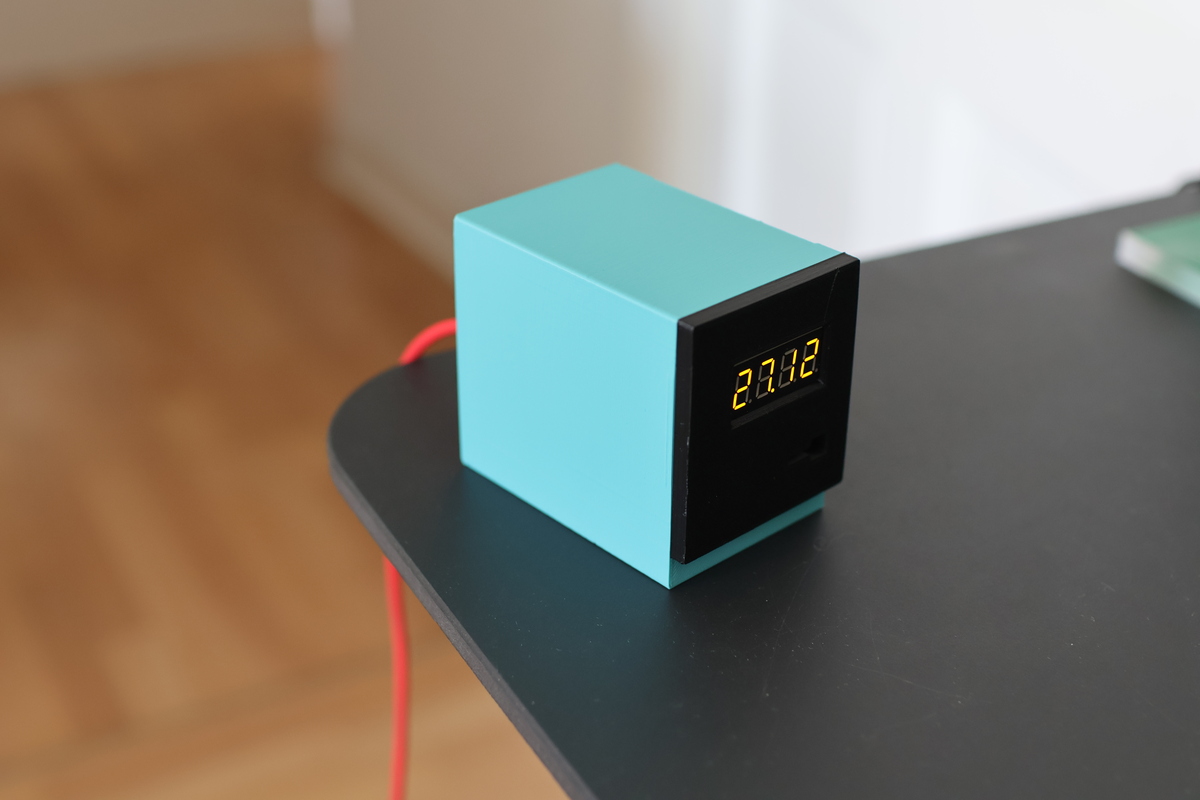
To optimise the energy usage, I set up a deep sleep for 60 seconds. Now it lasts 1 week on two AA rechargeable cells (each 2500 mAh). This is the final code:
1 2 3 4 5 6 7 8 9 10 11 12 13 14 15 16 17 18 19 20 21 22 23 24 25 26 27 28 29 30 31 | import busio import board import adafruit_mcp9808 import time import TM1637 import alarm CLK = board.GP7 DIO = board.GP6 display = TM1637.TM1637(CLK, DIO, 0) dead = False try: i2c = busio.I2C(board.GP1, board.GP0) t = adafruit_mcp9808.MCP9808(i2c) temp = t.temperature print(temp) integerPart = int(temp) decimalPart = int((temp % 1) * 100) display.numbers(integerPart, decimalPart) except: display.hex(0xdead) dead = True if not dead: time_alarm = alarm.time.TimeAlarm(monotonic_time=time.monotonic() + 60) alarm.exit_and_deep_sleep_until_alarms(time_alarm) |
I soldered everything together using the venerable Pinecil, which is such a pleasure to use.
Last step was to create a 3D enclosure for the whole thing. I started with a Macintosh-style enclosure, but needed to make it bigger and fit more components inside. After several iterations, I managed to design a fitting box in Blender, print it and assemble the thermometer.
* Improving Go library for PayPal
6. May 2020, Jakub Horák. Categorized as Go.
Recently, I have been working on a project for a client of mine connecting to REST APIs of PayPal. I must say that PayPal APIs are not the most developer-friendly and comfortable to work with. I encountered hiccups in webhook configuration, since there are multiple generations of them (“Webhooks”/IPN/PDT) and the documentation is lacking in clarity. Through trial-and-error somehow I found the right configuration. Then I came across a feature (a bug) in the transaction search API, that the payments only appear in the search results several hours after their execution.
There’s a reason, why many people looking for a payment provider, which is easy to integrate, choose Stripe. While Stripe offers an amazing official Go library, Go developer support on the PayPal side is weak. The only help comes from a community-made client for PayPal REST APIs.
My contribution to improve the PayPal client is a pull request with new transaction search method, which got merged in version v3.0.18. To anybody making a decision to about a payment provider, as long as it’s an option, I recommend to use Stripe.
* Automatic plant watering with Raspberry Pi
3. December 2018, Jakub Horák. Categorized as IoT.
Who hasn’t had hers/his plants die at home while traveling for a few days? Unfortunately my plants suffered from this fate too. Since I already have my plants connected to the internet via Raspberry Pi, notifying me whenever the soil gets dry, one solution is to have that same event trigger actual plant watering. That’s what I set out to accomplish. By researching online, I stumbled upon an interesting tutorial Raspberry Pi Automated Plant Watering with Website which describes the hardware build very well, but adds a web server on top, which I find useless. I decided to run my own software stack.
Hardware parts necessary (assuming Raspberry Pi plant sensor is built already):
- mini motor water pump 3-6V
- 7-10mm aquarium hose
- container which can hold some water
- soldering iron, solder
- 5V relay
- old USB charger
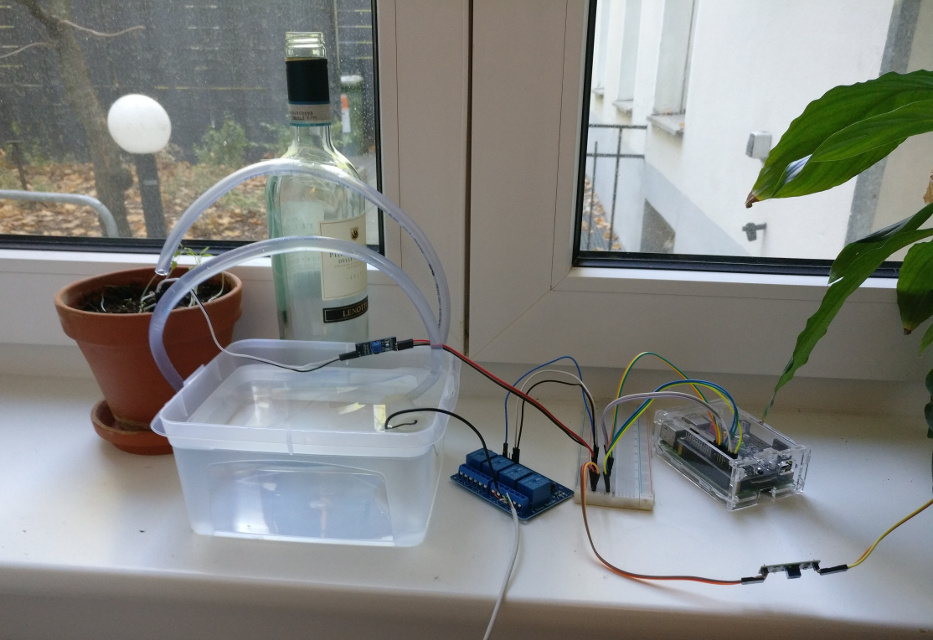
After getting all the necessary parts, first step is to cut the USB charger phone part off and expose red and black wires. Next, solder the red wire sticking from the pump to the red wire exposed from the USB charger cable.
When the soldering is done, it’s time to connect everything together. See the complete wiring diagram with two moisture sensors in the figure below.
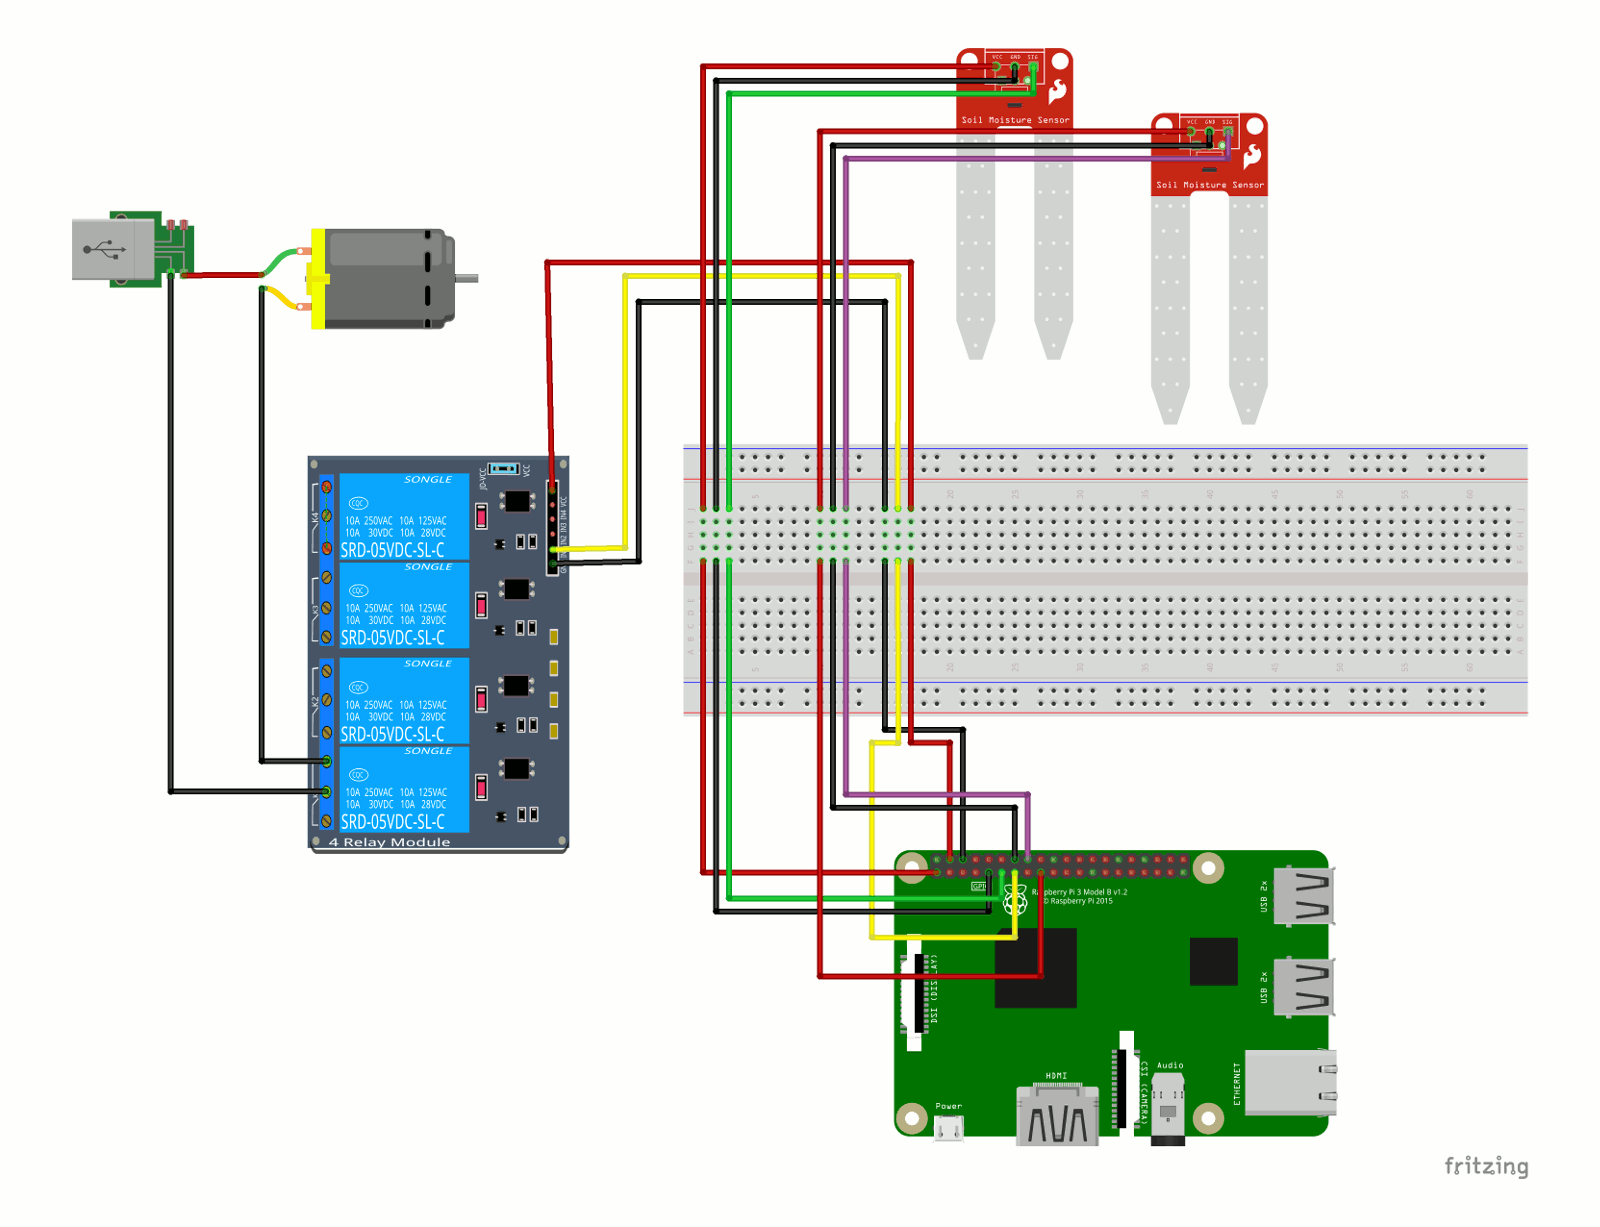
I have two sensors for two plants, but only one water pump for now.
Ports (as per pinout.xyz) used for the pump are (first relay, then Raspberry Pi 3):
The next step is to fill the water container with water, tape the pump as close as possible to the container’s floor and use something (e.g. a wine bottle) to hold the outlet from the hose. I measured, that the motor can pump 23ml of water each second, thus it should be enough to pump for 1 or 2 seconds each time when the soil is dry.
As for software, get my updated scripts from the associated GitHub repo. The configuration from moisture.py can be seen below. First the moisture sensors are set-up:
# Define the GPIO pin that we have our digital output from our sensor # connected to and URL which to call on sensor state change sensors = { "peace_lily": (17, "** URL 1 **"), "parsley": (23, "** URL 2 **") } |
then the water pumps:
# Define the GPIO pin that we have our digital input to the # respective relay connected to and number of seconds to pump # each time pumps = { "parsley": (27, 1) } |
When I get my second water pump, after wiring, I will just add a new entry under “pumps” with the corresponding pin.
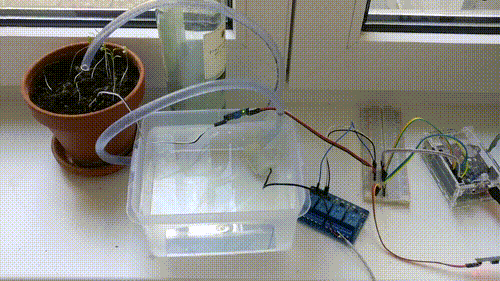
Watering system in action
That’s all folks, happy farming!
* Feiertag Alexa skill update
3. October 2018, Jakub Horák. Categorized as AWS, IoT.

As it turns out, several people use my Feiertag Alexa skill, which I’ve described in a previous article. Recently I’ve upgraded it to use Amazon’s new device location API. Therefore now immediately after you install the skill through the Alexa app, you get asked, whether you want to share device country and postcode with the skill. That makes the user experience much easier, since you are no longer required to link an Amazon account to the skill. For backwards compatibility reasons, I’ve left the account linking in, but made it optional. So current users don’t have to change anything and will still get the correct Feiertag for their Bundesland.
Check out the updated skill in Alexa Skill Store. Just install it and ask: “Alexa, frage Feiertag, wann der nächste ist.”
Source code is in my GitHub repo.
* Connecting plants to the internet
25. July 2017, Jakub Horák. Categorized as IoT.
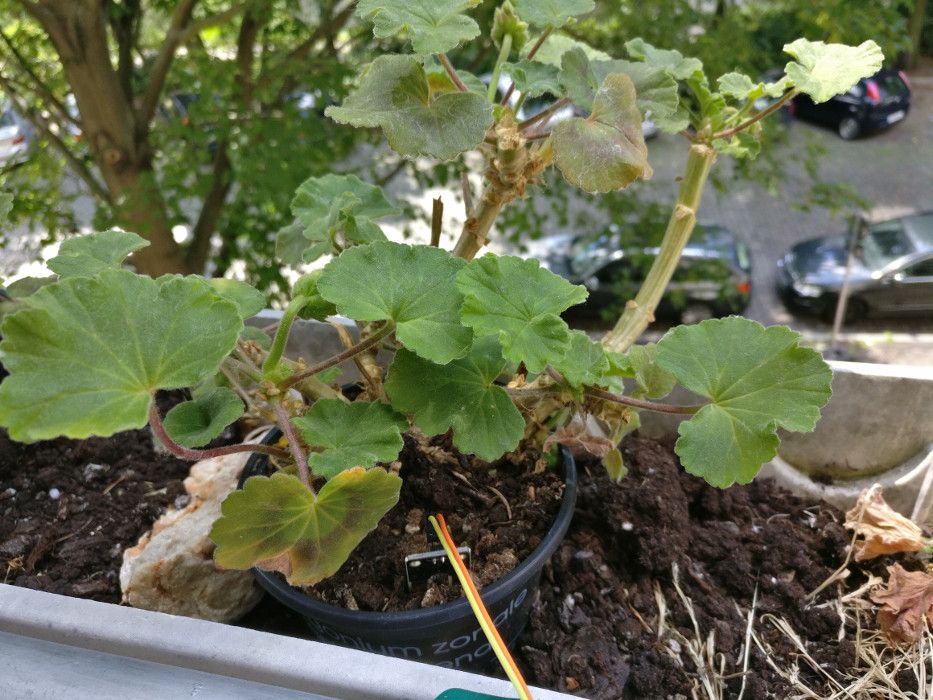
I have a couple of pelargonium plants on my balcony and I’m always struggling to determine, when to water them. By chance I also have a Raspberry Pi 3 lying around, so I’ve decided to do a little IoT project, turn the plants into cyborgs and let them tell me, when they need watering.
The connected plant
The basic setup is inspired by the Moisture Sensor Tutorial.
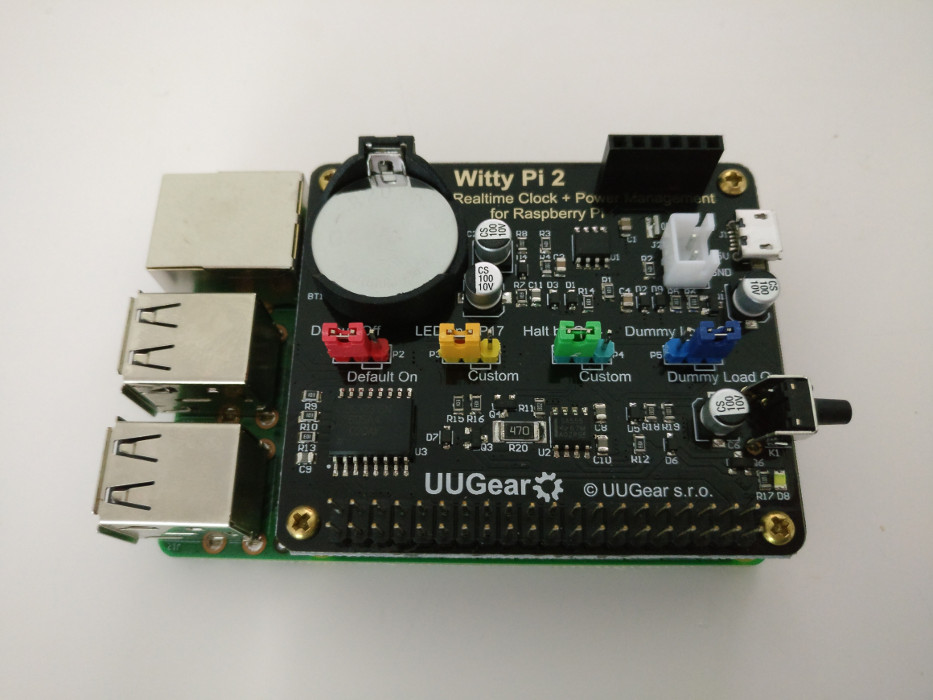
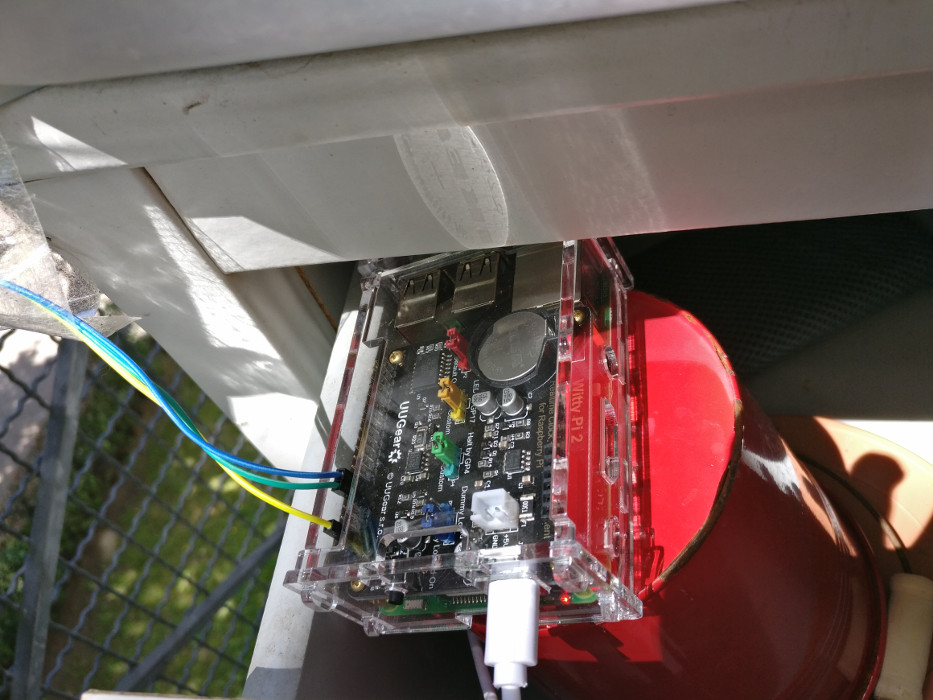
Raspberry Pi 3 with Witty Pi 2 mounted on top
To provide electric energy, I bought the Ravpower powerbank with capacity 26800mAh. However even the massive battery doesn’t last more than three days in this setup. That’s when I found a nice extension board for Raspberry Pi called Witty Pi 2, which will handle turning the Pi on and off based on a schedule, thus conserving huge amounts of energy. See the photo on the left. I set the schedule to turn the Pi on for 2 minutes once every 2 hours. The whole thing can keep running like this for about a month without recharging.
To summarize, here is a complete list of used components:
- Raspberry Pi 3
- Witty Pi 2
- Ravpower powerbank with capacity 26800mAh
- Moisture sensor
- Breadboard
- 5 jumper wires
Placement in a drawer on my balcony
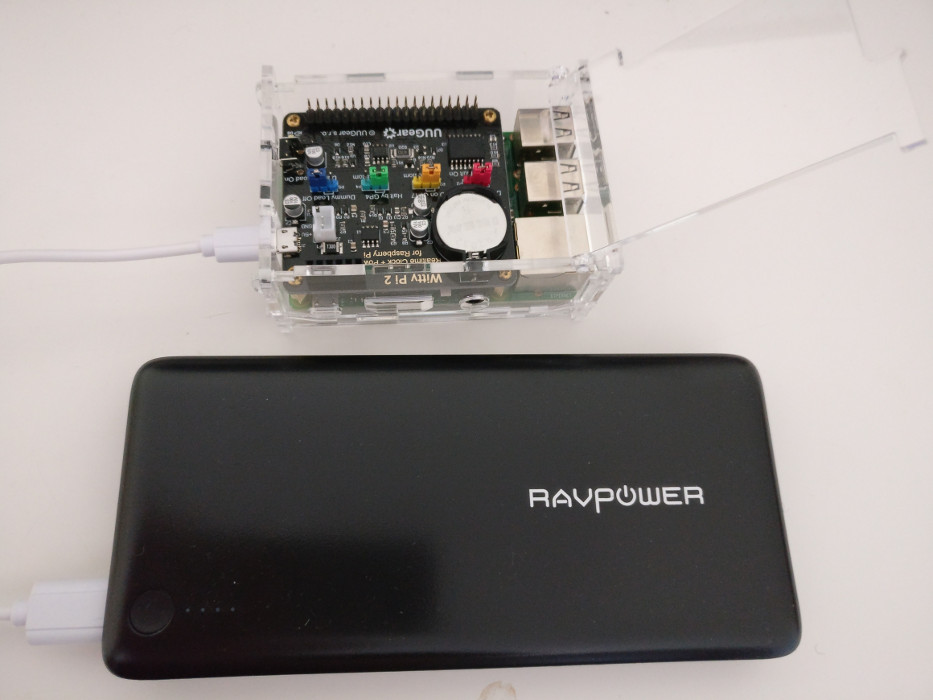
Raspberry Pi 3 with Witty Pi 2 on top and a powerbank
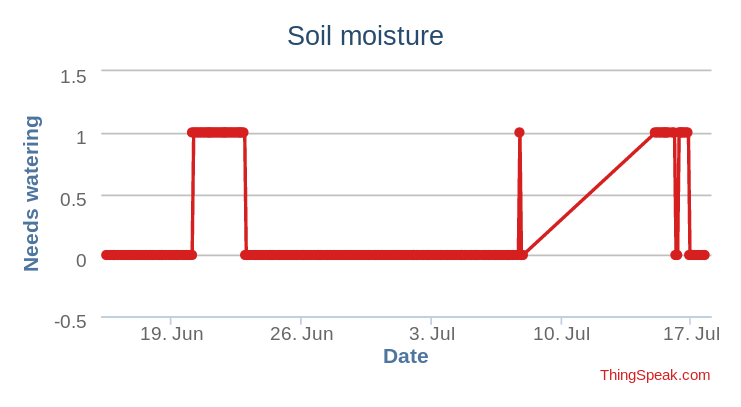
ThingSpeak chart
The hardware running smoothly, finally, let’s discuss the code. I started off with the tutorial’s Python sample and extended on that. I ended up with Ansible scripts. Ansible takes care of the configuration deployment, so whenever I’d format the Pi, I just need to install Raspbian, replay the Ansible playbook and I will get the same software installed and configured on it. Check the repo on Github. Pretty sweet!
* Alexa, frage Feiertag, wann der nächste ist
16. April 2017, Jakub Horák. Categorized as AWS.
The topic of AI assistants is recently one of the hottest in technology. With Apple’s Siri and “Ok, Google” now available in every smartphone, Amazon is not behind and has its own Alexa. As Amazon is not a phone maker, the assistant’s main place to live is a special speaker with integrated microphone array known as Echo.
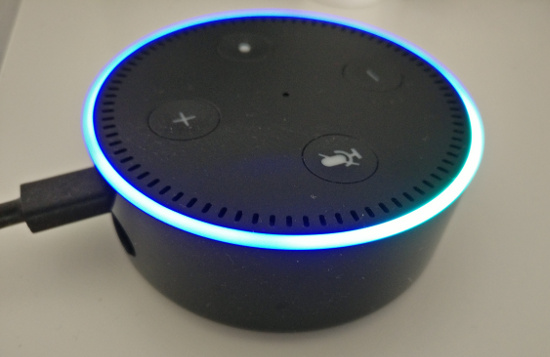
In December 2016, Amazon was just introducing Alexa in Germany and came up with a promotion, under which everyone, who publishes three Alexa skills in the Alexa store within one month, will recieve a free Echo Dot device. That and curiosity were good motivation for me to start developing. I made a first primitive skill quite fast. It took just two hours. I wanted my second skill to be more advanced though. An idea came to me to make a skill, which tells you, the user, when the next public holiday is. That is actually quite useful in Germany, as different Bundeslände have different public holidays.
Alexa skill’s main part consists of an AWS Lambda function, which takes input from the Alexa speech model and outputs a text which will be told to the user. Lambda currently supports Java, Python and Node.js. As the developer gets charged by the used memory, I believe it’s best to use Node.js. Most of the examples online are implemented in Node.js too, and Alexa’s Node.js SDK provides more features than the Java SDK.
My new skill, which I call Feiertag, requires you to link your Amazon profile and fetches the postal code from your primary Amazon postal address. The postal code is then used to determine the Bundesland in which you’re residing and subsequently the public holidays that affect you. One of the ways to can interact with the skill is:
Alexa, frage Feiertag, wann der nächste ist.
As it took me a bit longer to finish the skill, I missed Amazon’s promotion for a free device. So when an Echo Dot became available for pre-order, I bought one myself. Unfortunately while testing my skill, I discovered, that the Alexa itself can tell you the holidays without the need to install any skill. You just ask:
Alexa, wann ist der nächste Feiertag?
This sentence sounds much more natural than the previous one, right? The difference is that it doesn’t contain invocation of my “Feiertag” skill. Too bad, that my skill is not bringing any new cool features, but at least I got to do a nice programming exercise.
See the source code of Feiertag skill on Github.
* Spaong, the space pong game
14. March 2017, Jakub Horák. Categorized as Game development.
Last weekend we got together with Mark and Merten for a hackathon weekend with a goal to make a game. We have succeeded and the result is called Spaong. It’s about two alien robot races, Vulgarians and Profanians, who both hate humans. However a human astronaut seems to have gotten lost in the empty space between their planets! What will happen? The game requires two players and at least one of you needs to bring a gamepad.
Play the game at spaong.zee.cz to find out!
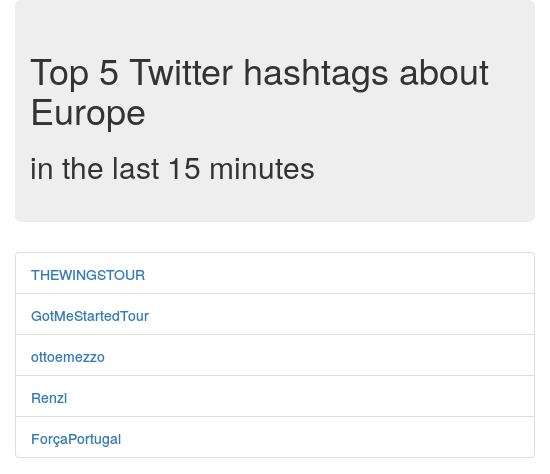
* Feud.eu – Analysing Twitter hashtags
18. November 2016, Jakub Horák. Categorized as Twitter.
Expanding on the idea of my previous project MrTweety, I wanted to provide better real-time data and also try out big-data processing software. That’s when I discovered Apache Spark, toolbox used to manage distributed batch processing. My chosen project was not too complex, I was thinking of it being more like a proof of concept. The basic idea is to analyze a real-time feed of tweets posted globally on Twitter. From each individual tweet, occurrences of hashtags are counted and summed in 10 second intervals together. From these intervals a 15 minute sliding window is generated and hashtag counts again summed to form the final table. Top five most occurring hashtags are shown as a result.
To start, I checked out the Twitter API and saw that they offer streaming API. After some research, I’ve found an official Twitter Hosebird Client library and an example of how to use it to publish messages to Kafka. Kafka is messaging system that is also a perfect source of data for Spark. That means we have one subproject for taking the Twitter stream and “producing” it into Kafka. A Spark subproject is then receiving the data and processing it. While working with Spark, I got a little derailed, when I found that you can use Twitter receiver directly with Twitter DStream. However when I actually tried this library, it didn’t work. I suspect that the DStream receiver tries to connect and read Twitter API from multiple threads and that forces Twitter to block the connections altogether. The Twitter DStream project got deleted from Github, while I was using it, so I’ve decided to go back to the Kafka approach. The official Hosebird Client claims to implement the limits and backing-off mechanisms correctly, so I believe it’s better anyway.
After that. Spark does all the hard computing work for us. We just specify, what we want to do with the data. Spark is made to be distributed, but for this small example we use just one node. Everything is running on Amazon ECS, which is a nice “Docker as a service” platform. To make it work, we just need an EC2 instance to run the Docker container. The basic t2.micro instance’s 1GB of memory was not enough for the all the included hungry JVMs, so I had to get a “spot instance” m3.medium with 3.75GB RAM. In the current market the costs should be around 7.5$ per month.
I’ve developed the whole project from scratch on Github as open-source, so check it out there. The production site is feud.eu. Here is a screenshot:
Note: A similar project that I’ve found and that could be interesting to check out is Twitter Analytics with Spark.
Archives
- July 2025
- March 2024
- October 2023
- May 2020
- December 2018
- October 2018
- July 2017
- April 2017
- March 2017
- November 2016
- April 2016
- March 2016
- November 2014
- September 2014
- May 2014
- March 2014
- February 2014
- August 2013
- June 2013
- April 2012
- August 2011
- May 2011
- October 2010
- September 2010
- August 2010
- December 2009
- November 2009
- October 2009
- September 2009
- August 2009
- July 2009
- June 2009
- April 2009
- January 2009
- December 2008
- October 2008
- September 2008